Thursday, January 29, 2015

My Ode to Pantone's Color of the Year: Marsala

So the color of the year, according to Pantone is Marsala, and I've created a few looks in inspiration to that color.


According to Pantone Marsala is described as: "Much like the fortified wine that gives Marsala its name, this tasteful hue embodies the satisfying richness of a fulfilling meal while its grounding red-brown roots emanate a sophisticated, natural earthiness. This hearty, yet stylish tone is universally appealing and translates easily to fashion, beauty, industrial design, home furnishings and interiors."

It's a little frou-frou of a description for me, but basically this is a warm red-brown tone. 

Out of the polishes I have, and have recently acquired, I put together some nail art in inspiration of Marsala.

I don't know if you've heard, but KBShimmer, a great and affordable indie brand, has come out with a holo polish in inspiration of Marsala. It is called Men are from Mars-ala, and it is beautiful!

 photo A6123BA8-C725-4134-8FBD-85B5E0E4AE95_zpsg5bmbm9e.jpg

I paired Men Are From Mars-ala with Zoya Pepper, a great darkened brick red. This is a gorgeous creme and pairs well with so much! I used it a lot in the fall. 

 photo 8D0167C9-15A5-4ED7-8DEF-27AAC78B7CBD_zpsaqxpl679.jpg

To create the perfect single chevrons I used smART Nail Vinyls I won a contest from Serene at CopyCat Claws!

Anyway, on to the next look. For this look, I wasn't even trying to go for a Marsala nail look, it just ended up being that way. 

 photo DCEB00F1-4B14-4DCF-BB6A-F2C3480780C6_zpswlptwajz.jpg

I started out with a new to me indie Elevation Polish The Sea Was Red. I don't even know how to accurately describe this, but I was so very impressed with the quality and uniqueness of this polish. I seriously have nothing like this. 

 photo AC14F8E1-AEBD-463B-BEB0-7034750B9FFC_zpso3tfttzl.jpg

I paired it with Zoya Marnie (once again using smART Nail Vinyls), a creme polish I bought specifically because I thought it was a less brown version of the color of the year. Turns out it paired perfectly. I totally love it! This is a softer, more maroon/mauve-y version of the color of the year.

So what do you think, which did you like best? How do you feel about the color of the year? I quite like it, even though it can feel a bit dated. I still think there are ways to make it feel sophisticated.

Wednesday, January 28, 2015

Born Pretty Store Plate Review

Hey guys, today I am going to provide a little review on a stamping plate I received from the Born Pretty Store.


To start this mani, I did a base coat of Essie Chills and Thrills (the blue). Once that dried I sponged on a gradient of Chills and Thrills and Essie Hip-Anema, which is actually a coral-leaning-red, but over the blue base it comes out more maroon!


Next I got out my BP stamping plate BP-22. This one is super cute with some single butterfly images (which for some reason, aren't on the BP-22 plates they currently sell online) and other fun circular designs. For the look I was going for, I used the slice of design on the bottom right of the photo above.


I used the Born Pretty Store Stamping Polish in white, this I purchased on my own and just love. I have only gotten their black and white stamping polishes so far, but I really like them so I might purchase some more again soon. They dry really quickly, so you have to work somewhat fast, but the payoff is super opaque and crisp stamping. I've had good experiences with their stamping plates so far too!


Who doesn't love a good gradient/stamping combo? I think these turned out really great and I really like the design! Almost like little butterfly wings! I just purchased Ellagee's Lickety-Split to help with the clean up of gradients, so expect to see more gradients in the future!

Have you tried ordering from the Born Pretty Store? If you do plan on ordering in the future, please use the discount code TRAH10 when you check out for a 10 percent savings. The Born Pretty Store is located in Singapore, but they have world wide free shipping and super affordable prices. The shipping take a few weeks, but the wait is worth it.

Monday, January 26, 2015

Fishtail Braid Nails

Today, as a part of Crumpet's 52 Week Pick and Mix Challenge, I attempted a new to me nail art technique: The Fishtail Braid nails.

I google'd a few tutorials and watched them first, just so I got the hang of it, but basically this is braiding strokes of three different colors.

 photo FAE9256B-7B62-43DD-A2E7-94E34B241DF4_zpsjkktzxby.jpg

To begin I used two thin coats of LynBDesigns Seize the Day, Boys, a lovely teal holo polish with gold flashes. The application on this was perfect, very impressed with the quality of this polish. It is a bit jelly like on the first coat, but evens out by the second coat.

 photo 2E4B9C33-579C-4287-910A-F1D75FFE201A_zpsznvqb4xf.jpg

After that I went to work on the Fishtail Braid technique. It was a little difficult at first, but once you get the hang of it, it isn't so bad.

 photo 88D3CA1A-D0BC-4719-AA12-4AC446908429_zpslyeavcwp.jpg

To complete the look I added a dotticure to tie in the three colors on the other nails. I was originally going to do a skittle look, but I accidentally went nuts with the dots so I didn't get there unfortunately.

 photo D639A246-61DF-418A-9282-5C86C8FF6069_zpsnnrjx7ya.jpg

The coral/red polish is Zoya Rocha and the silver is Essie No Place Like Chrome.

 photo CA8776D2-05C5-4902-8BD5-CAAD4F8B97E9_zpsez7qvryu.jpg

Overall I liked this look, and trying a new technique, but I found it a bit time consuming trying to make sure the layers were dry between strokes. I think this technique probably works best with one coaters, which Seize the Day, Boys was not. The polish does build up on the Fishtail Braid nail, so you have to be extra careful not to dent it.

What do you think? Have you tried this nail art technique before? Do you have tips to share?

And don't forget to check out the other ladies taking part in this challenge today!


Thursday, January 22, 2015

Stamping and Dotting Combined

Hey guys, it's the end of the week, nearing midnight on Thursday night for me on the West Coast and I am practically falling asleep but I did a challenge and gosh darn it if I'm not going to share it with you.

Today's prompt comes from Stamp One, Stamp all Ten! and is stamping combined with dots.

 photo 10149CFE-D804-4287-A7C2-70C7063C97E5_zpsm0fybwk8.jpg

The base polish is Philly Loves Lacquer Don't Cut the Line Bro and is a dusty purple holo. I'm not going to lie, application was not the easiest. The polish was a bit clumpy and thick to the point of it being a little hard to work with (I don't know if it's because I got a mini or what). But it is a unique color to my collection, which is nice.

EDIT: Esther, the mastermind behind Philly Loves Lacquer contacted me to replace my bottle. I'll post more on the polish in the future!

NEW UPDATE: It is now April 8 and I still have not received a replacement bottle. I have been in communication with the maker twice since to remind her and still have received nothing. I think with the communication and quality issues of this polish, I might be wary of purchasing from this brand in the future. Just thought I'd leave a warning out there to those considering this brand.

 photo 94F18ED2-545F-4B59-AA10-7A998531EE00_zpsndz1aomk.png

The stamp is Bundle Monster BM-607 and is a bunch of random loop-di-loops of dots. So I stamped using a dark purple Essie creme and then added dots in various spots throughout the stamped design. I was not super impressed with this whole look, looks sloppy to me. I've done much better work combining stamping and dots, but oh well.

Sorry I'm less than enthusiastic tonight, I'm half asleep writing this and have to get up at the crack of dawn tomorrow.

I'm going away for the weekend so YAY, what exciting things are you up to this weekend?!

Don't forget to check out the other ladies who take part in this prompt at the inlinkz below!


My Nail Art Must Haves

Hi guys, my Mani Must Haves post really inspired me to also share with you my favorite nail art tools. So you can easily take your nails from drab to fab with a few simple tools!

 photo 8BDEEC94-5B2E-4523-A85F-72D45C3A932F_zpsjhfywgsn.jpg

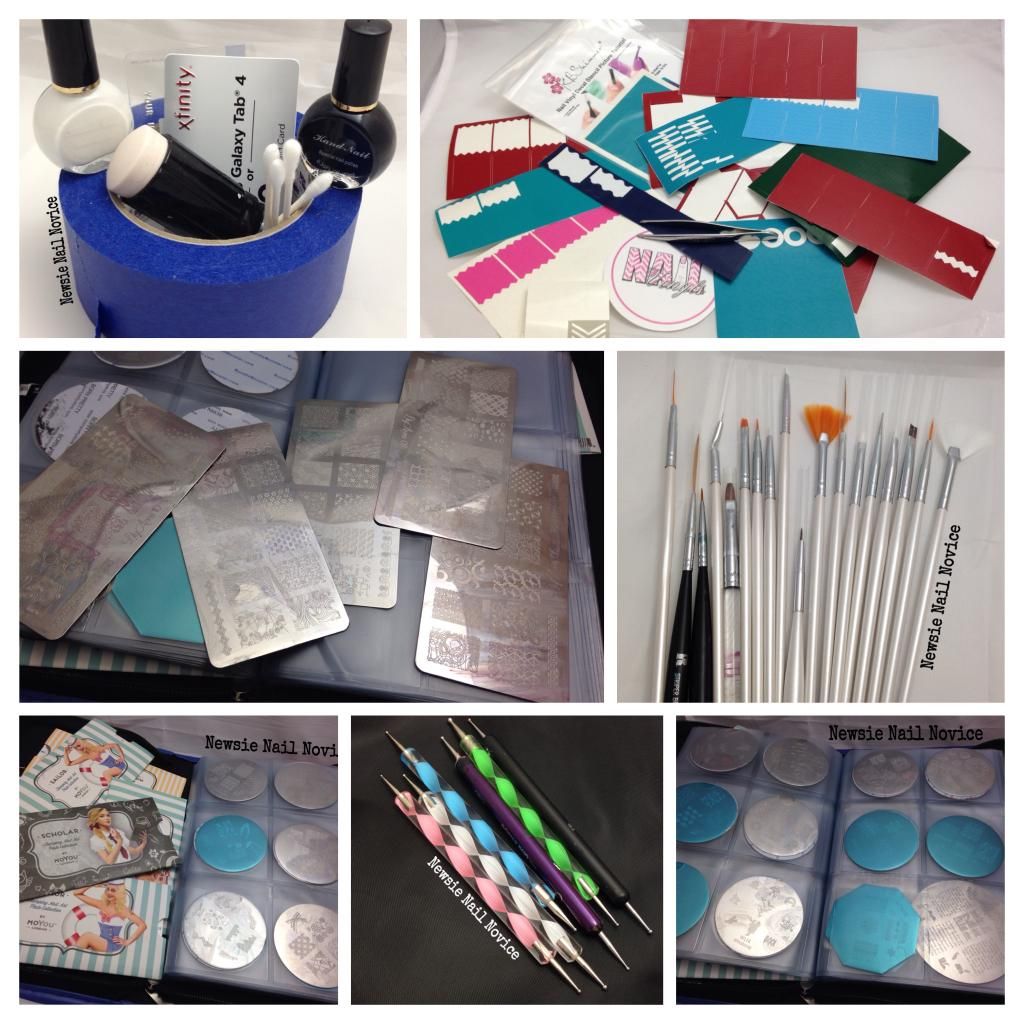
So where to start? I'll start with the simplest tools first.

 photo E6A9BCD7-E5D0-4F34-A7C1-2F769245510A_zpsqtiwwfkc.jpg

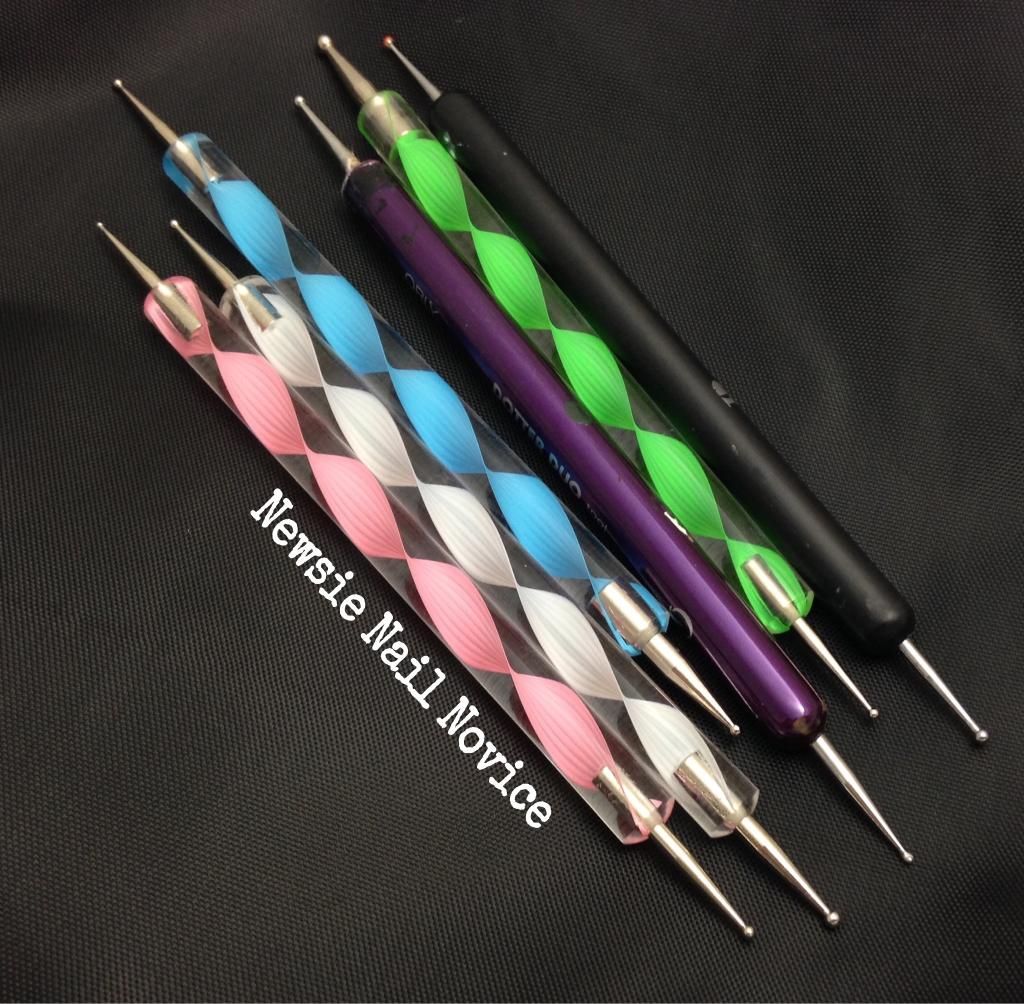
Many beauty supply stores sell these in sets. I got a lot of these from a set I got from the Born Pretty store! Don't forget to use the code TRAH10 for a ten percent discount!

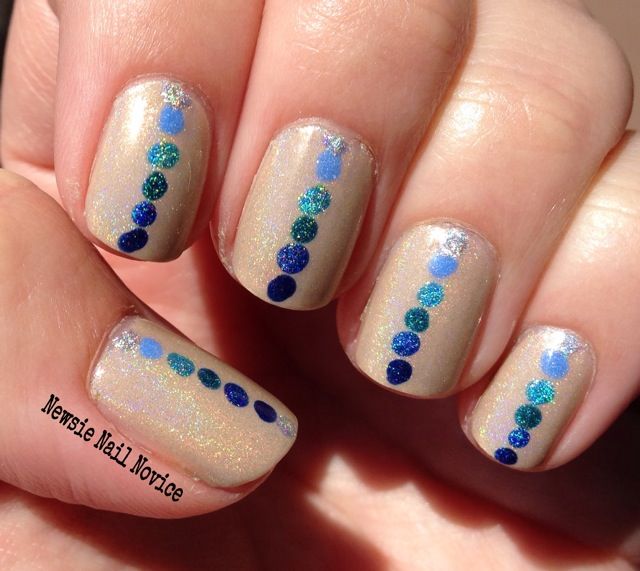
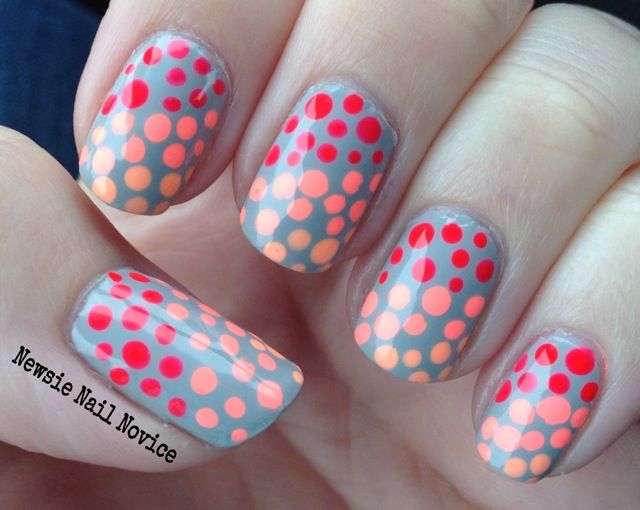
Dotting tools are super easy to use and can really jazz up any old mani! You can do fun things with it like a straight line of dots, a dot gradient, or a dot funky french. The possibilities are endless.

 photo 12CAE9B6-4ED0-493C-B817-E99AE2E62E8F_zpscqyrrkiw.jpg

 photo B420DE5D-EF57-4667-9B85-68C281D7C14A_zpssfmmcebh.jpg

Next up, a new favorite of mine, are nail vinyls.

 photo 696E9AAA-06CD-4AC8-B9A7-F5306EE5A2A3_zps477plyeu.jpg

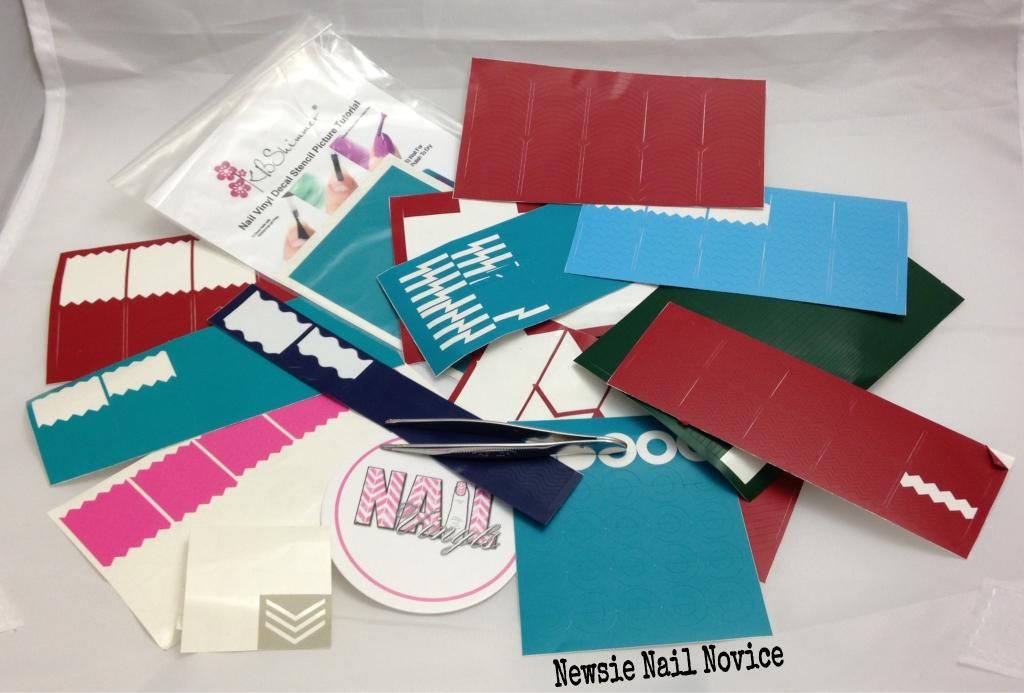
A number of indie makers have nail vinyls, but I can tell you my favorite go-tos are NailVinyls.com and KBShimmer! Each sheet ranges from $5-$7, and you can get a multi variety pack (which is a good way to start if you can't ever make a decision like me)! They have straights, chevrons in various sizes, scallops, lightening bolts, even holiday related ones!

Application is something you need to get used to, but once you do this can become nail art in a snap!
Tips: Before applying the nail vinyl to your nail, make sure your base coat of polish is extra dry. Remove extra stickum from the vinyls by applying to the back of your hand a few times, I find this makes removal easier. And removal is easiest with tweezers (forgot to take a photo with my tweezers, oops).

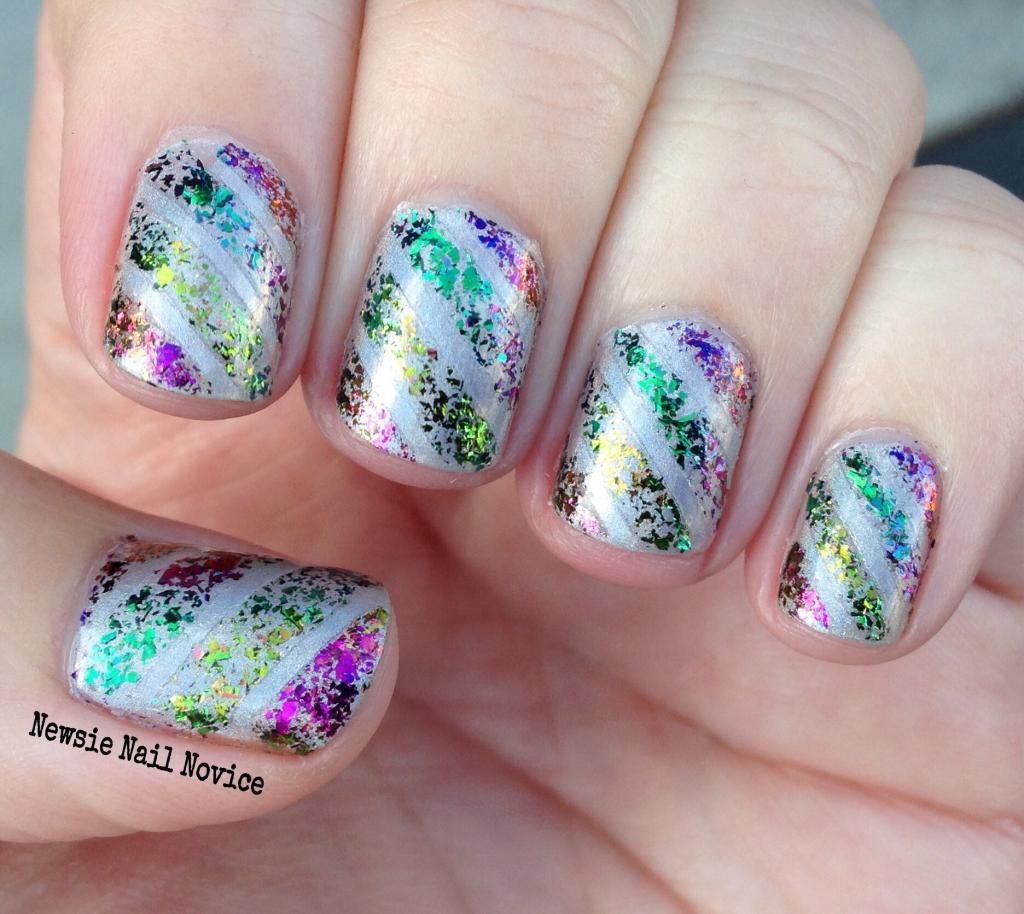
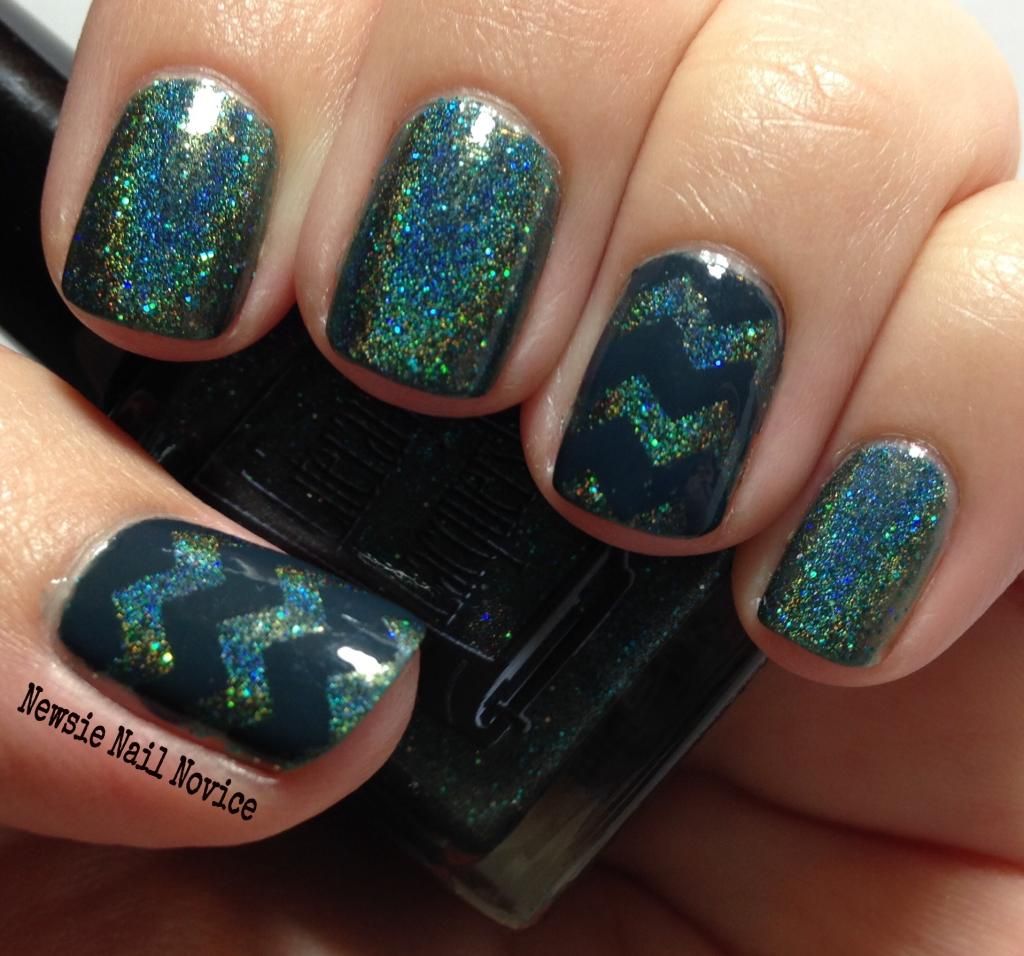
Here are some fun manicures I have completed with nail vinyls!

 photo 12D4DE7B-A9E4-44D9-809A-50F37B7AE37F_zpsagehaipt.jpg


 photo 036BDA98-45E8-4B70-AFD9-29828B4CB52E_zpsq76hw8qb.jpg

Moving on toward the more challenging – stamping is up next!!!

 photo BA4CDAC0-D832-456A-9904-B283B30B8224_zpsc8ewc30f.jpg

Before we even get to plates, here are my nail stamping tool essentials.

A good stamper. I use this one from the Winstonia store and it hasn't let me down yet! Not too soft, not too hard and not too sticky. When you get it you'll need to prime it, but that is pretty easy, there are a bunch of YouTube tutorials on it!
A reliable scraper. For the scraper, I never use the ones provided with stamping kits. I go straight to the throw away credit cards they send in the mail. They have straight edges which are ideal for scraping the paint away in the metal plates.
Q-tips! These are a great tool to use to clean up the polish in the plates after application. I dip a little in acetone, use that end to clean up the excess polish and the other end to dry off the design.
Blue Painters Tape! Why? Well this little handy tool is the perfect way to clean off your stamper with any excess design that didn't transfer to your nail.
Good stamping polish. This can be hit or miss for awhile. Once again, the Born Pretty Store is a good place to start. I really like how crisp their stamping polish is. It dries really quickly so I find that you have to work a little quicker, but the results are fabulous. I also find that Zoya cremes and Essie cremes stamp pretty well as well. Drug store quick dry polishes, like the Sally Hansen ones also work pretty well. Good rule of thumb is if it is a one coat polish, it probably works well for stamping.

Now on to the plates!

 photo 71D6872F-671A-404D-911D-FB197B8D61A0_zpsl0h50jhy.jpg

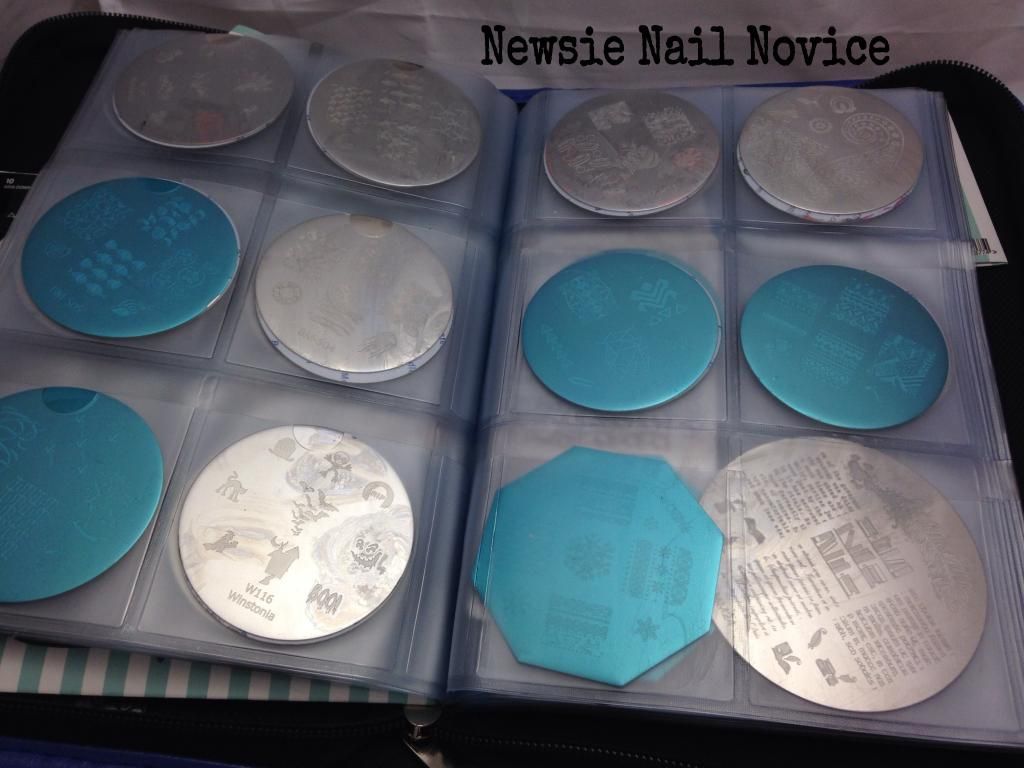
There are many many places you can get plates but I'll tell you what I've tried and what I find works best. I started out with the Winstonia plates and they are pretty reliable from what I've experienced. They have some nice sets, which you can get at their website or even on Amazon. They are also where I purchased this handy dandy plate holder from. A must when the plates start piling up!

I've also tried Bundle Monster, but their plates can vary in quality. I had some issues with some of the original plates I purchased from them, but their more recent collections have been pretty good in quality I must say. A plus when it come to ordering from them, you can get individual plates for a steal of a price.

I've just started getting Born Pretty Store stamping plates, but have been very surprised at their quality. They are super inexpensive too and you can buy them individually as well. Shipping takes longer since they are international, but it also free!
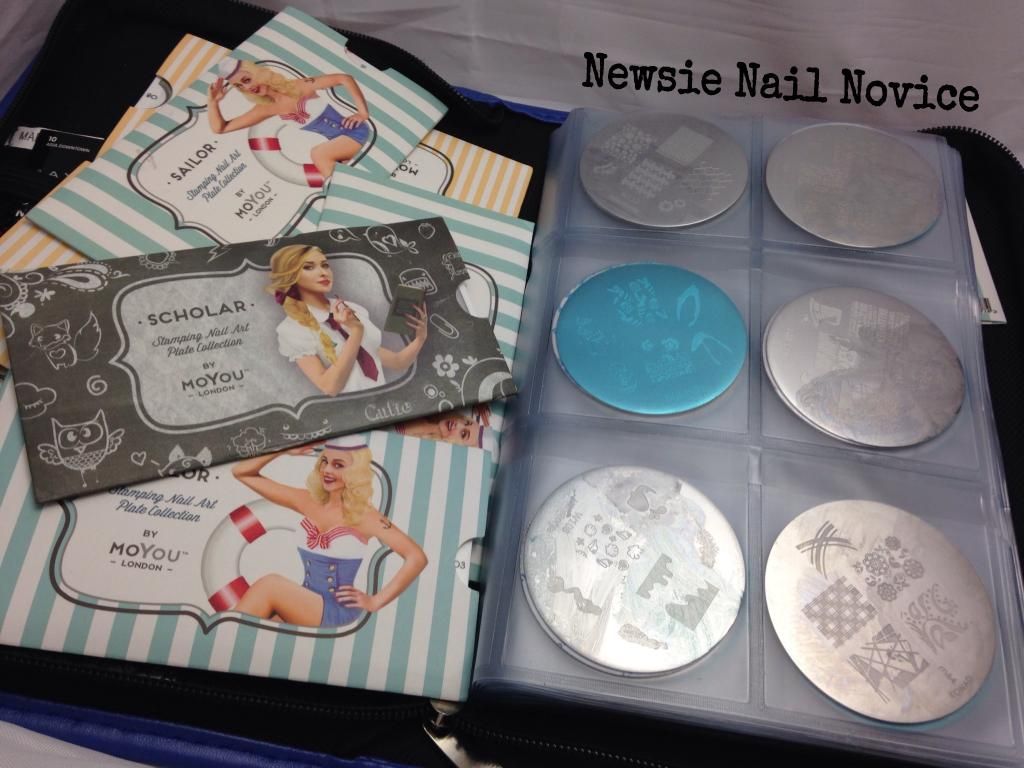
 photo 218361D6-2014-49C9-A5A4-8A855079EA3C_zpsxaasbjj0.jpg

Next up is the MoYou London plates, which are the best in quality I own. These retail for a little higher of a price, about $7.50 a plate. But the images are great. And their smaller images work well on my nails, so I can get a lot of images on one plate. 

 photo CEA75BD1-FE68-4B5A-8EA2-B9C35E234BA9_zpsfxs5me5u.jpg

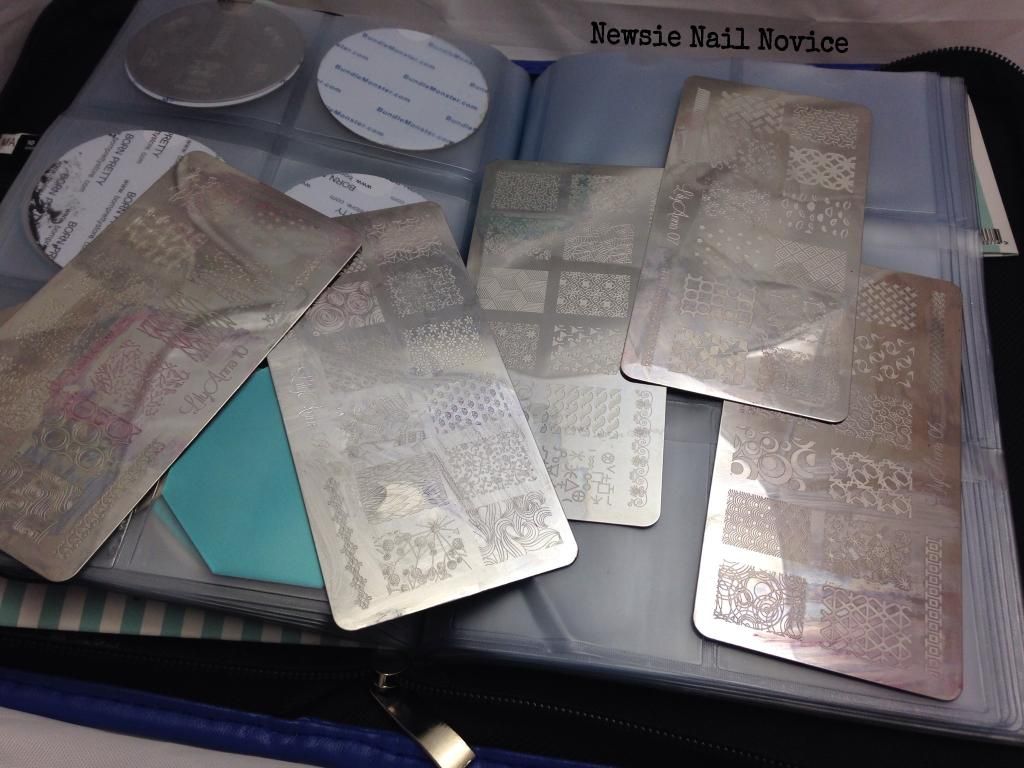
And my most favorite plates of the moment are the Lily Anna plates from Messy Mansion. Messy Mansion is out of Australia and shipping is around $6 for plates only. I just love the designs on these plates, they are so unique and I pull them out for so many different looks!

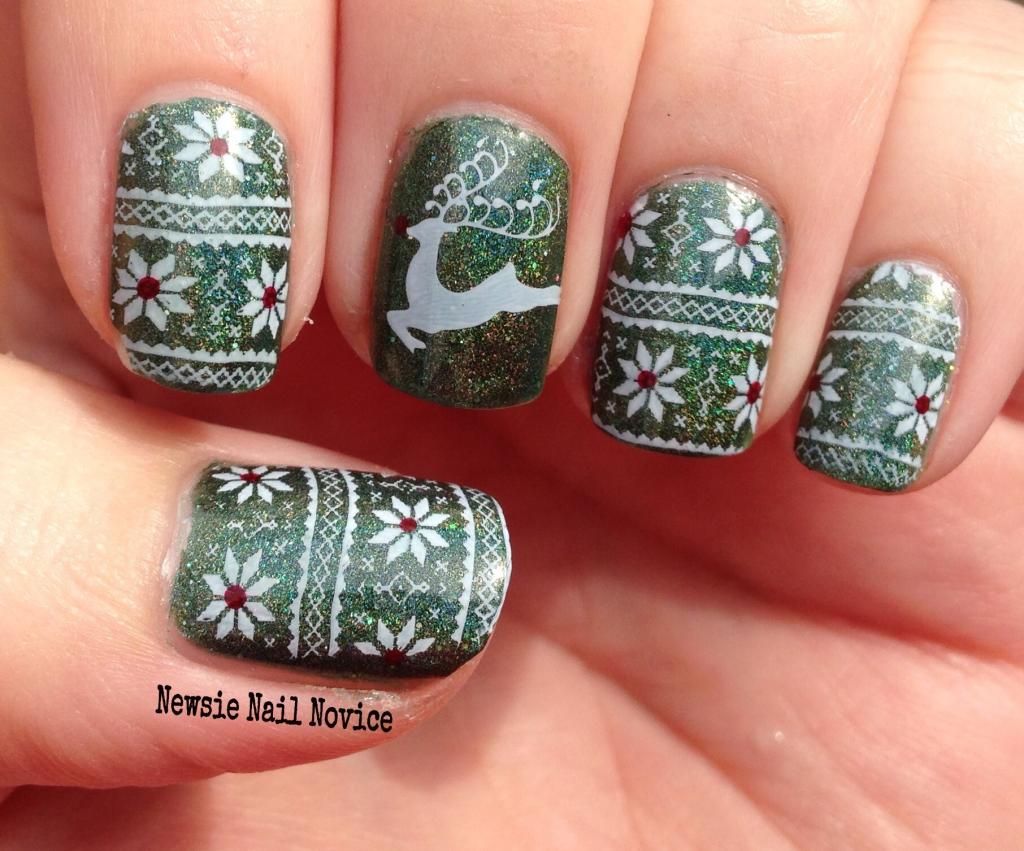
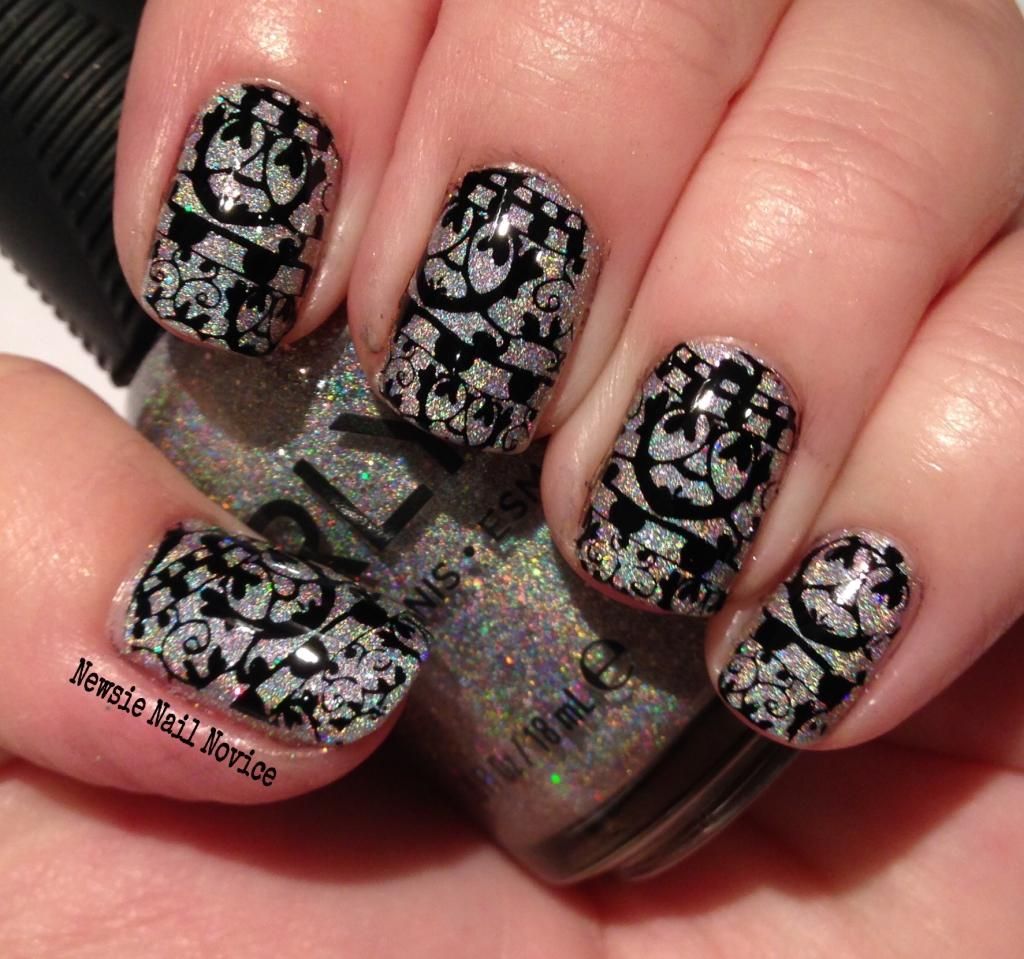
And now the fun part, I'll share a few stamped manis for your viewing pleasure!

 photo 91FA149A-0878-4269-B6C4-2D0BB22B092C_zpstmsuycal.jpg
Bundle Monster and Winstonia stamping using Born Pretty White Stamping Polish

 photo BC380759-BEB9-421F-96DE-EB2B82EFD3C1_zpskoab72pk.jpg
Born Pretty Store Black Stamping polish and a Born Pretty Store plate

 photo 47807C6D-83A0-40A8-ADE2-4C0A4726D2E2_zpsgt3vbmle.jpg
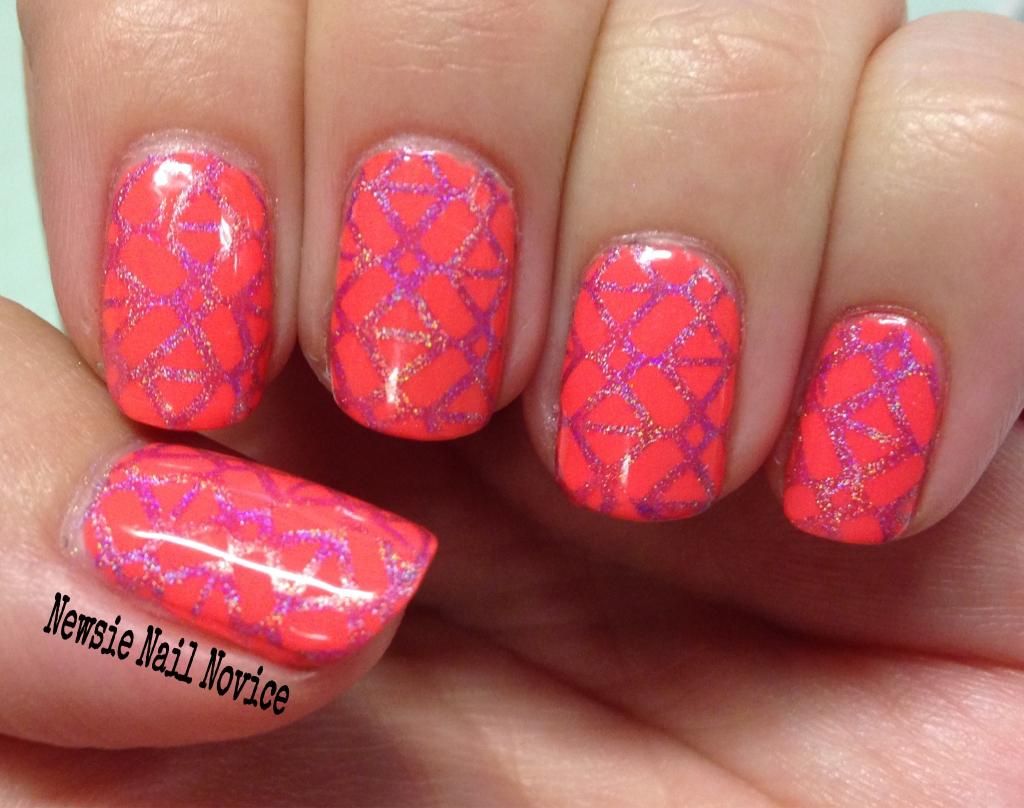
MoYou plate stamping with a drug store white (I can't recall what polish this is exactly)

 photo E0ABD422-9625-407C-9019-4AE5AE6542D1_zpsmkgddsi2.jpg
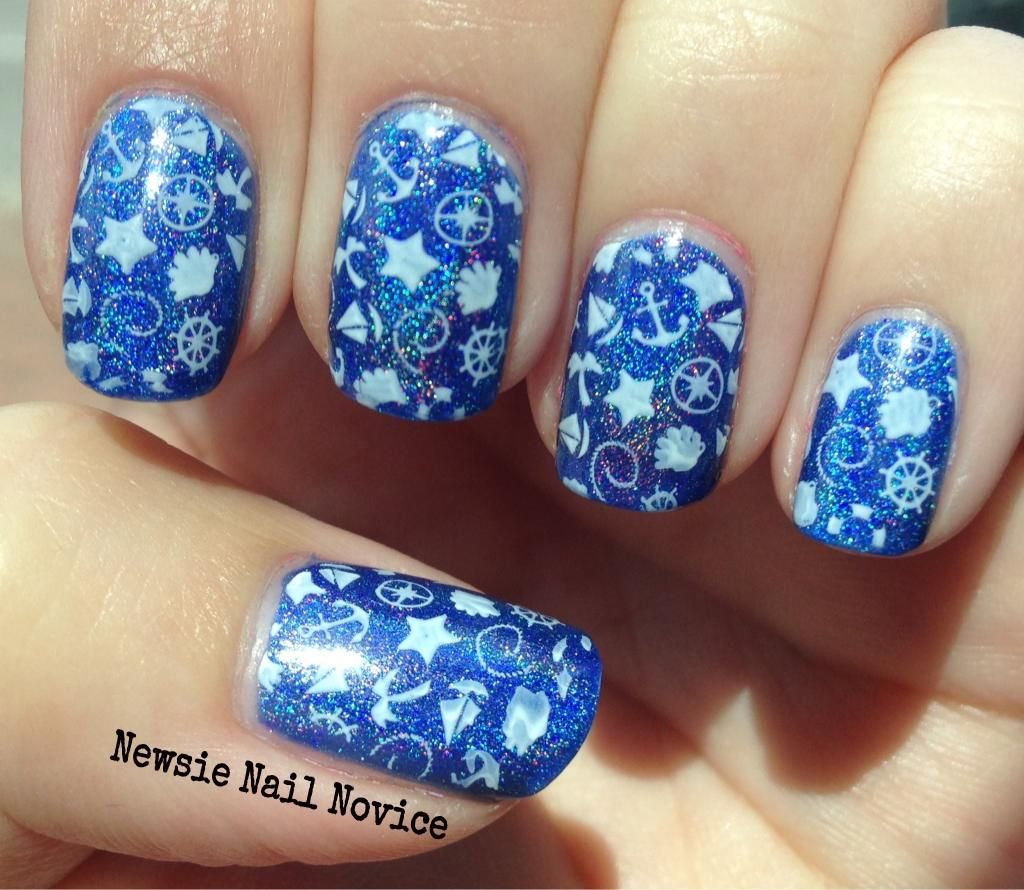
Lily Anna stamping plate with a Color Club Holo polish to stamp with.

Now for the most advanced, for which I haven't even mastered yet, the nail art brushes.

 photo AF7364F7-6828-440F-9E01-F3E47BAC99ED_zpsi3motp6m.jpg

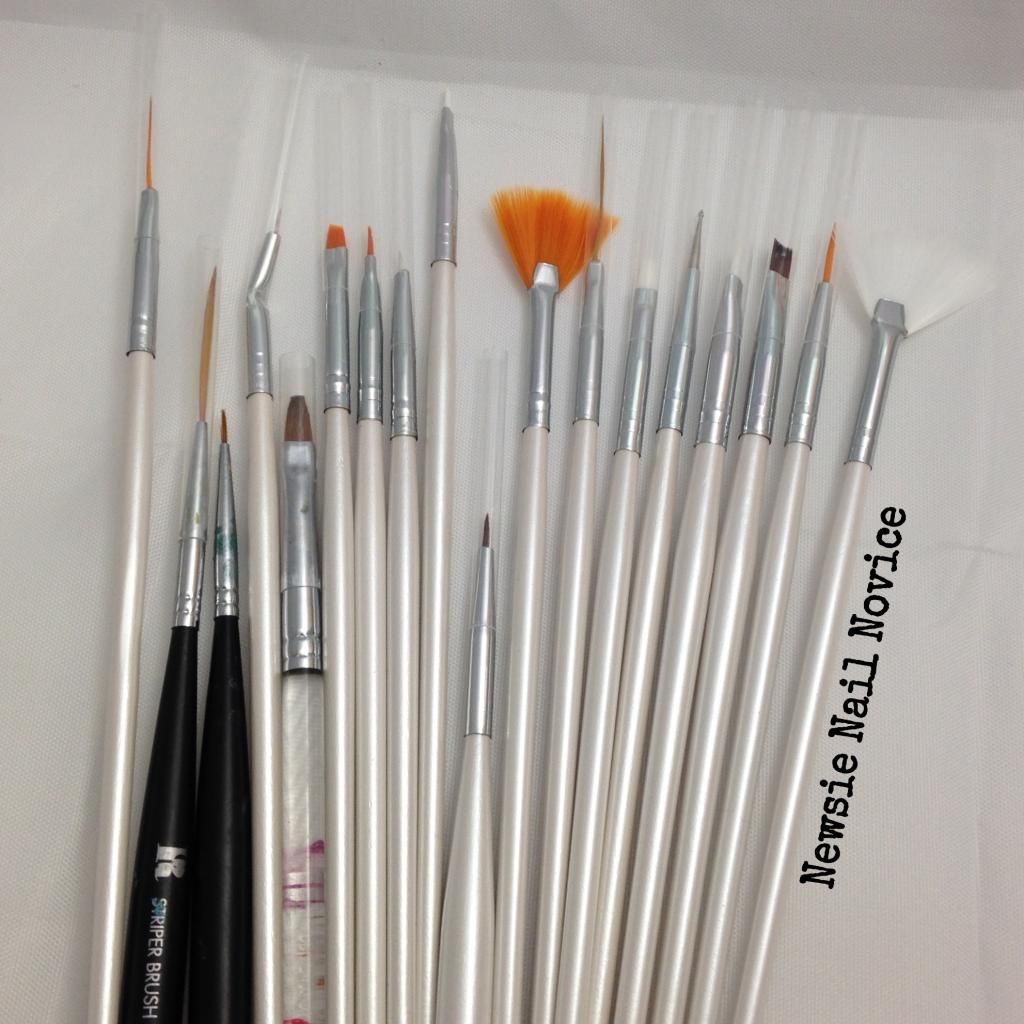
I got most of these in a set from the Born Pretty Store, because it was a decent price, but I heard you can get the acrylic brushes from a craft store and they work pretty well too.

I haven't put a lot of these to work yet, and I heard you can do a lot of nail art with acrylic paint over a polish base, but like I said, I haven't been that adventurous yet. I'll share with you my most recent mani I used the brushes for: My Piglet Nails.

 photo 88109534-EF49-4762-A02B-468BAEEA76A4_zpsmsx3xq0q.jpg
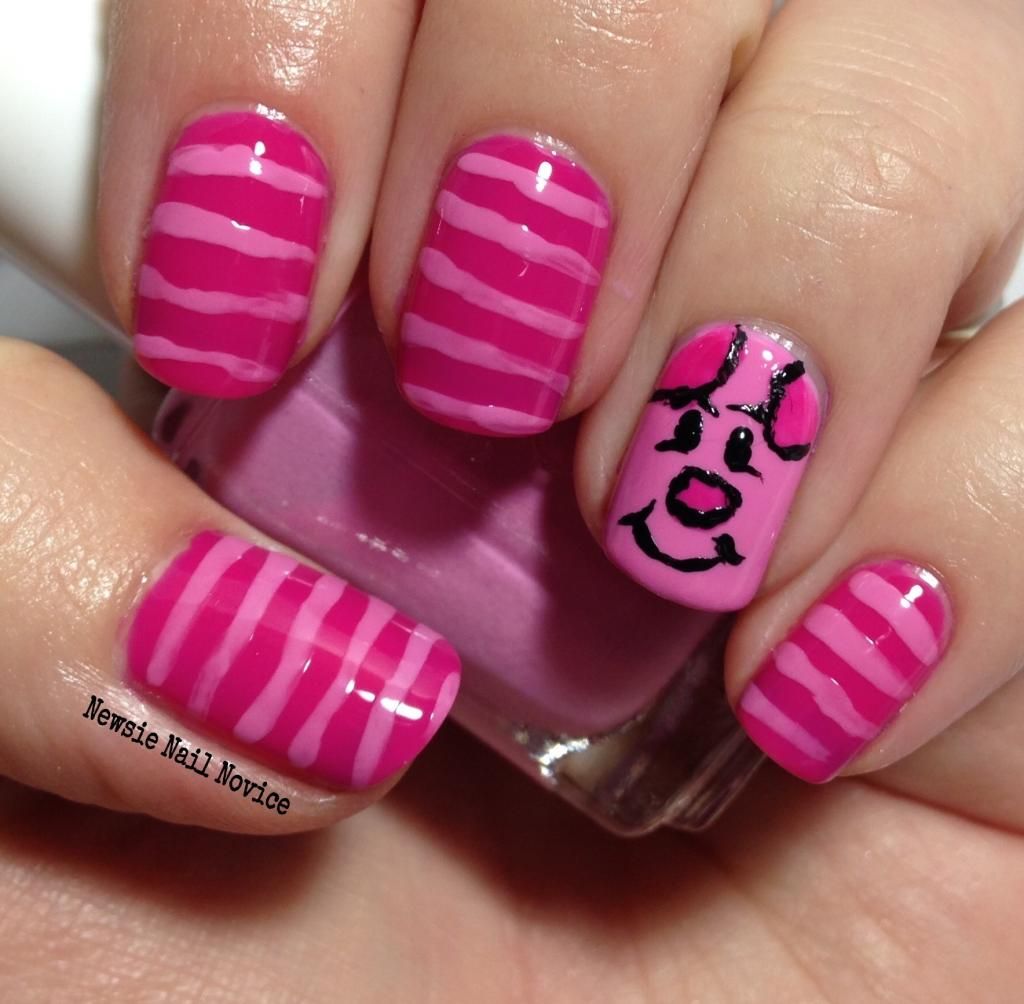
I used the striping brush for the stripes and a finer brush for the face.

As you can see, my freehand leave a lot to be desired. But practice makes perfect, and I just got acrylic black and white so I can start playing a little more with different looks.

There are of course a slew of other things you can use for nail art – 3D Nail Gems, makeup sponges for gradients, liquid latex for quick clean up – these are just what I use most often to take that regular manicure to the next level.

I hope you enjoyed this post. I had so much fun writing it and I hope that you learned a tip or two along the way! What are your favorite nail art tools? I'd love to hear about them, maybe I can try a few new things out!

Wednesday, January 21, 2015

Three Greens Nail Art Challenge

Hi everyone, I'm back with another Crumpet's 52 Week Pick and Mix Challenge. This week I chose the prompt three shades of green and/or yellow (the other prompt was fire and I couldn't quite figure out how to tie the two together, but Serene at Copycat Claws did an amazing job!).

So I didn't just pick out three greens, I picked four, because I just love green. It is my favorite color!

 photo C2782632-6CCE-45DA-9F65-9AEF7A3F837B_zpshcgehjrv.jpg

I started out with two thin layers of Color Club Kismet, because, I guess I can't do a manicure with out some holo!!! Kismet is a great super linear holo that is almost lime green leaning yellow green, just lovely.

 photo 502C481C-6BAE-4C5C-B2EF-980D6FE348ED_zpsdqptdori.jpg

Then I took three Zoya greens, from top to bottom, Noot, Hunter and Shawn and stamped them using this scale-y design.

 photo DCF23D20-4E28-4382-A193-7C84ACC0DA6F_zpsmyy8hcdd.jpg

It's harder to see the three greens in the light because, um, hello holo, but I think the effect is nice in the shade and in the sun!

 photo EA177C39-097F-4915-9BCD-162BFF01D113_zpspsyc3k9d.jpg

The stamping plate I used is Lily Anna 09. I just love my Lily Anna plates, I seriously probably use them for more jobs than anything other plates I own (I own Lily Anna Plates 6-10). I think I want to collect them all because all the looks are so versatile. I might ask for some for my birthday (coming up in early March).

Overall I called these my dragon nails, because I just love the look of the scales and the green was just so dragon-esque!

My original concept for this mani was using Noot as the base and various green holo polishes in a dotticure gradient.

 photo 4996FA8D-E295-4DF4-A87C-ACAA4E456D56_zpsaxquczgj.jpg

The reason I didn't stick with this one is because I feel the three shades of green holo get lost in each other. I decided to show it off though because look at how amazing Noot looks as a base. I can't believe this was an untried for me. I will definitely be breaking this out again for a nail art project in the future. Just look at how creamy and dark it is. Such a strong color, without being super black, which you can get with a lot of dark creme polishes. Just stunning!

Anyway, that is it for today. Don't forget to check out the other ladies taking part in this challenge!!!


Tuesday, January 20, 2015

My Mani Must Haves

I've seen a lot of nail care posts out and about around the interwebs today and I've always wanted to share what I use, but I just never got around to taking nice photos of all the products I use. Fast forward to this weekend when my husband left town for a guy's weekend on the slopes, so I had a lot of free time on my hand. In addition to relaxing, I got this post put together! Yay. So now I can share with you all the great products I use/love.

 photo 4f89035e9c4e83e255734a354fb189a2_zpsa16c704e.jpg

It all started because someone in a Facebook group I am in posted a photo of her work space, where she does her manis, and I thought adding that to this post might be fun.

 photo 4812C607-F692-425F-A31B-2BE7EA2BA96A_zpssvsbzmgs.jpg

This is a photo of the guest bedroom in our condo. I usually do my nails while sitting on the bed and watching TV. The shelf features a spice rack with my to-swatch/recent purchases pile. The light helps when I am doing my manis and I use it for photography as well. I keep my light box folded up in between the bed and the dresser so I can take photos when I feel like!

The tray holds all the essentials, remover, base and top coats, some stamping polish, a nail file and a magazine I use use to scrape excess polish or place used nail vinyls, or whatever. I don't always do my nails in this room, so it is nice that I can just move the tray easily into the other room and do my nails there as well. A moveable workspace works well for me! What does your workspace look like?

Ok, on to the products!!!

 photo AF11AC08-5744-4291-91D1-B00BEC2E1139_zps0wezuqbg.jpg

First up is removers. When removing most manis I use Zoya Remove because I find it is less harsh for my nails, almost moisturizing! If you've never tried it, you must. It is the best remover out there hands down!

I also acetone remover, which you can pick up at a drug store or local beauty supply. I use for clean up and tougher remover. To clean up, I just pour a bit of the remover inside the cap of the acetone bottle and dip my clean up brush in it as needed.

Also, for glitter polishes, The up&up Nail Polish Remover Dip-It is a must have. Glitter polishes are so gritty and difficult to remove. I absolutely hate it, and sometimes admittedly I avoid glitter polishes because of this. But the Dip-It, while is pure acetone and not so nice on the nails, rally is a saving grace when removing glitter polish.

 photo 314314A5-A562-4610-8DAE-54D8873812CA_zpsj8zkrxix.jpg

For nail care, I use a glass nail file I got as a gift from years ago, and I thought it would be good to feature my clean up brush. I've been using this for about two years now, I know it has seen better days. But it has held up pretty well! I got this clean up brush in a Red Carpet Nail Art kit, back from when I tried gel nails many moons ago!

 photo F03FAA8C-7D04-4A19-B8D0-5EB5D022A9A8_zpshfkasvoe.jpg

Now on to base coats. I've been on quite the journey the past few months testing various base coats after my beloved Revlon Colorstay Base Coat was discontinued. The Revlon base coat was seriously a Holy Grail product for me. Made my manis last forever. If your manis don't last like you want them to, you really have to try switching up your base coats. Believe it or not it really does make a difference. After trying many different base coats (boo to CND Stickey, it stains my nails!) I think I've finally settled on Essie Grow Stronger, though I find it might not protect as well from staining polishes (thought that was only once), but it does make my manis last longer and my nails stay stronger!

 photo D13E97DC-8DA5-4F07-AA4F-B4950065C610_zpsdmcyzmyv.jpg

Next is top coats. These are also as important. I use KBShimmer Clearly on Top as a great quick dry top coat that is affordable too! It's only $5.00. Brand new this is a great top coat, but I do find I need to thin it about halfway through, otherwise it does shrink the polish a bit (don't worry it's nothing like Seche Vite). The coolest product I just discovered is Marvel Liquid Macro Top Coat. This is another quick dry top coat, but I have to say what I've noticed most about this one is how well it retains it's shine! This retails for $6.50. It is lovely. My bottle is still new, so no news on if it thickens after awhile, but I'll try to post an update if I remember. The Sally Hansen is there as my drug store go to, but honestly this one rotates. I use an extra top coat when I have hungry glitters and I don't want to use a good top coat, so I'll just use whatever drug store top coat I have on hand and then top it with Clearly on Top or Marvel Liquid Macro.

 photo 11A5D76A-59D2-47E4-9E5B-6C1705554DC7_zpseeamqdyu.jpg

Now on to cuticle care. This is an area in which I have a ton of products, but don't use them near as much as I should. But I do want to remedy that. I really love KBShimmer's Cuticle Oil Stick, love the brush applicator, really saves on the mess. Cuticle Glaze is a heavy duty oil and is really great for moisturizing the cuticles, and has a lovely sweet cookie smell to it. I won this one in a contest lately and is created by the lovely Danele of Low Country Lacquer. The Qtica Cuticle Repair Balm is for the jobs when you need a heavy duty job of moisturizing dry cuticles or healing a hangnail. This is in a jar, but I like to apply it with an empty cuticle oil stick to cut down on the mess. And I use the Sally Hansen Instant Cuticle Remover to push the cuticles back, but probably only once a month.

 photo 1B1B4290-A591-4726-A4DE-69BC1F41D2EC_zpslr9dwav1.jpg

Probably one of the reasons I don't need as much cuticle care is because I moisturize like crazy. The Gold Bond Ultimate Healing Lotion with Aloe is THE BEST OUT THERE. I have tried so many lotions, but this is the best out there. It is thick, fast absorbing and so nice. The Ayres Body Butter is something I got in my ipsy bag, and liked it so much I got a full jar. It is a nice thick lotion, with a nice scent, and a little goes a long way. And it is also fast absorbing, which is a must have when it comes to lotion. Usually I apply the Gold Bond before bed, or just when at home and I my hands are feeling dry. I use the Ayres on my way out in the morning. Every time I apply lotion I rub it into my cuticles as well, which is probably what keeps the my cuticles pretty happy overall. 

 photo BBF8B0D6-4F27-4734-A7C2-99DA40EEC3D0_zps4vhfvhdh.jpg

Now for the pampering products. I keep my Qtica Sugar Scrub next to me in the shower, and use it around once a week. I use the Footloose and Fancy Fizz for pedicures, but also as a soak when I am treating my hands to a full on soak and manicure. And the most amazing find of the year for me, is the Forever Polished Mani Bombs, these things are so fun to use as a soak. They bubble and moisturize, and I just absolutely love them. This is the ONLY ONE, I have left. I have to get more during her next restock. Follow her on Facebook to find out when the next restock is!

So that's it! What do you think? Do you use any of these products? Have something to recommenced to me? Later this week on Thursday, I'll have my Nail Art Must Haves, which I'm excited to share with you too! I just love posts like these and I hope you like reading them too!


Monday, January 19, 2015

ILNP Holo and Flakies Stripes Manicure

Going through my recent purchases lately, I came across my flakies, and the new one I purchased to round out my collection and this idea just popped into my head.

What will they look like all together on the same nail, in stripes, almost rainbow like and put together? And how cool would it be to have a holo base?! Because I'm starting to suspect my motto should be, holo all the things!

 photo 8A08E9B3-0620-4A8D-84A8-DA073846ECAD_zps8cq6cqk8.jpg

I'll start with the stars of the show! I got a fun mirror and thought it would be a good idea to use it to bounce the light to show off these lovely colors. In the shot above are ILNP Electric Carnival, Supernova, Mega (L), Open Fields and Phoenix.

Now onto the lovely mani!

 photo 12D4DE7B-A9E4-44D9-809A-50F37B7AE37F_zpsagehaipt.jpg

So you know the order of the stripes, from top to bottom are Electric Carnival, Open Fields, Supernova and Phoenix. Mega (L) is the base. I used nail vinyls to create this look! Nail vinyls are the best! They can make any manicure look terrific!

 photo E75C32BA-AFF9-4923-9053-88ADAA21FF21_zpsnbjfmxqf.jpg

What I love so much about this manicure is, you can really compare the flakies side by side here. You can see the color shift, and the way the shifts play of each other. Almost a rainbow of flakies.

 photo 6A3A5C2E-15F8-4875-93C8-936332A195CE_zpsfqlixqsf.jpg

And then in the sun, you have holo amazingness. Mega (H) is new to my collection, and it makes a super fun base! I love it, but I'm not going to lie, makes it a little harder to see the flakie shifts!

 photo 0BA17953-1345-4969-9DC3-2EEA9F719265_zpstfoxxaud.jpg

Flakies are tough in the sun. And since I live in California, the sun is out a lot! I think their shift hides in the sun, they really shine in the shade. This is why I thought the holo base would be great!

 photo CC5A0188-4783-4575-BAB2-316D2296C0AC_zpsafkjnyqi.jpg

All the flakies in this post can be found at ILNP! The flakies retail for $12.50 and the holos retail for $10. 

So which is your favorite? I can't choose but I really really like seeing them all together. And layering? I haven't even tried that yet, but I've seen some crazy combinations out there lately! Flakies are all over the place, what have tried with them? What shift do you like best?!